Gabber
Overview
Gabber is a mobile app and web platform for running interviews. The web platform lets you setup a project with topics to talk about and a mobile app for recording conversations and tracking which topics are being talked about. The web platform then shows those conversations, with timestamped topics, and allows annotations and playlists to be created for the purpose of reporting findings.


Features
Anonymous Avatars
Gabber was designed around the idea of anonymity. Personal information in the system is only available to the research team and conversation facilitators. Unique avatars were generated for each user so you could distinguish a single person's interactions without using a real or username.
These avatars worked by combining a large set of icons with randomly generated colours.
For icons, appropriate FontAwesome icons were picked.
To generate the consistent colours a modulo function
was used to pick a hue value for a hsl colour.
To ensure a good spread of colours, a number that was co-prime to 255 was chosen. For example, if it was 41, the hue sequence would be:
0, 41, 82, 123, 164, 205, 246, 32, 73, 144, 155, 196, 237, 23
After the sequence passes 255, it loops back around and returns to 32.
Being co-prime means that all numbers 0-255 will eventually get used up after many iterations.
If it wasn't co-prime some numbers would be missed out meaning there would be less of a spread of colours.
If it were in javascript, the function would look like this:
const HUE_FACTOR = 41

function getUserHue(userIndex: number) {
  return (userIndex * HUE_FACTOR) % 255
}
Informed Consent
A key design goal of Gabber was to make consent as clear as possible and to clearly explain the different levels of consent users can give.
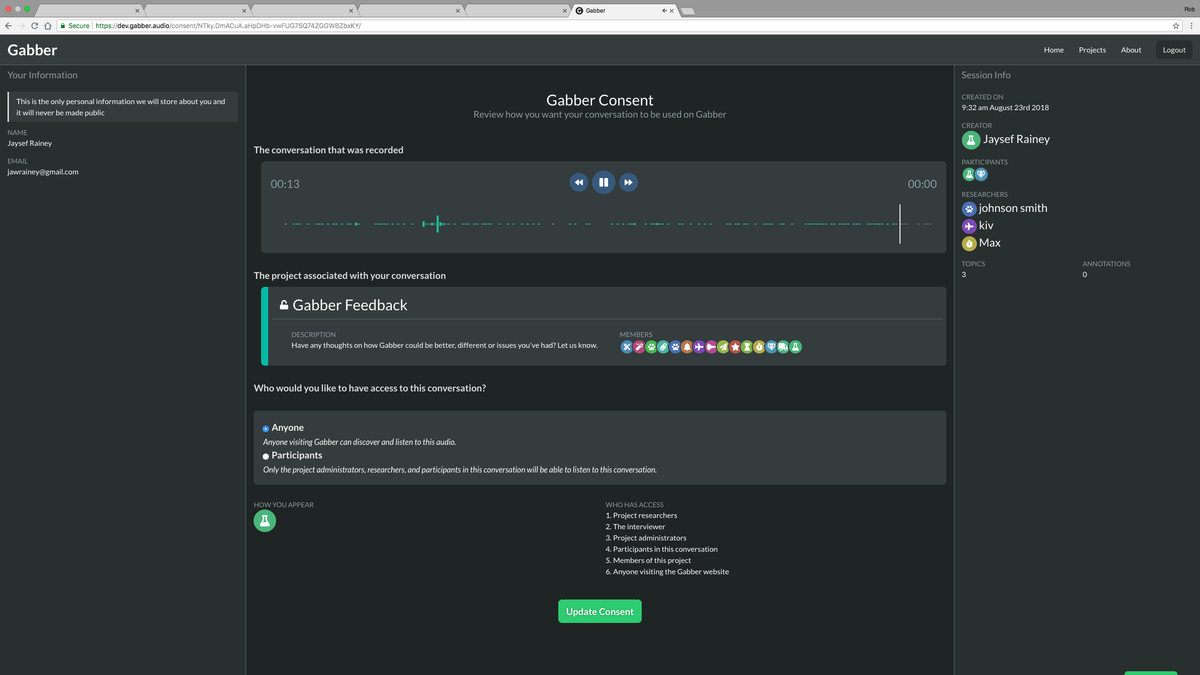
When a conversation is recorded, the participant's emails are taken so that they could be emailed to give their consent. The email contained a link to the web platform where the participant can explore the different levels of consent they can give and submit consent back to the facilitator. The web platform was strict and would not show any conversation without the consent of all parties that were involved.

First, the participant can listen back to their audio recording, to provide context and review what was said. Second, they can see exactly how their conversation will appear on the website.
Next, they can pick the level of consent that they'd like to give. Changing this value will update all relevant information so they can see exactly what change they are making and what effect is has. Lastly, the participant can see what they will look like on the web platform and see exactly who will have access to their audio.
There were also side bars to display the participants personal information and relevant project information too.
Audio Annotation
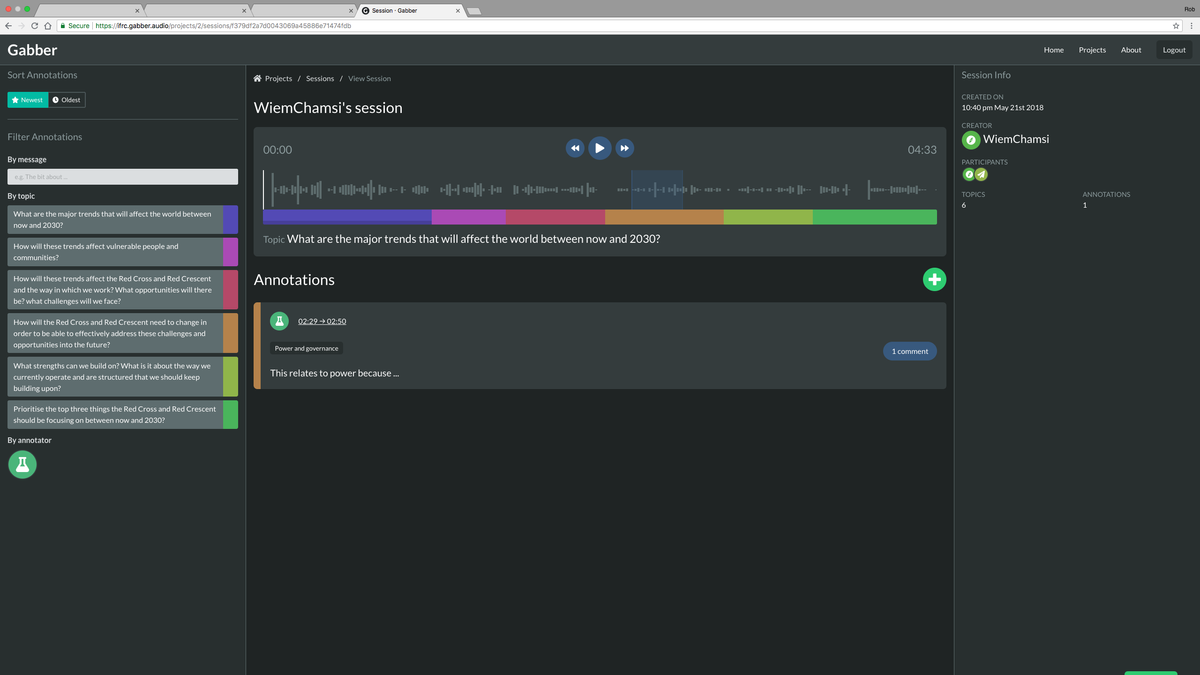
A major interaction for the web platform was listening to, annotating and creating audio playlists. A custom component was created for this. It showed a simplified waveform of the audio, to familiarise the interaction with audio. There are simple options to play, pause and track the audio to any point and the topics being discussed were shown underneath the waveform.

Clicking a topic in the sidebar or under the audio navigated the playback to the exact point that topic was marked as starting. This meant you could find specific topics being talked about.
Clicking the + button created an annotation around the current playback point, with drag handles to adjust the start and end of the annotation. It added a field and button to comment and submit the annotation.
Once submitted, annotations appear under the video and click on one displays the region that was annotated.
Based on annotations, playlists could be created to summarise findings while directly linking to the audio where the findings were found.
Technology
Event busses
With lots of complex frontend logic, event busses were used to allow cross-component communication without having complicated inter-dependencies.
For example, when a user logs out the AuthEvents bus is used.
It is defined quite simply:
import Vue from 'vue'

// A vue-2 instance provides all the functionality needed for messages
export const AuthEvents = new Vue({})
Then Vue components can subscribe to those events:
import { AuthEvents } from '@/event-busses'

export default {
  mounted() {
    AuthEvents.$on('logout', this.onLogout)
  },
  destroyed() {
    // Remember to remove the listener!
    AuthEvents.$off('logout', this.onLogout)
  },
  methods: {
    onLogout() {
      // Custom logout functionality
    },
  },
}
And the logout can be triggered elsewhere:
import { AuthEvents } from '@/event-busses'

AuthEvents.$emit('logout')
Technology stack
Gabber was made up of several different technologies.
The frontend was written in vue.js and used vuex to manage state and vue-i18n for internationalisation.
The backend was a headless python flask API and it was all deployed as Docker containers on a virtual server.
Injecting client-side environment variables
To allow for multiple deployments of the front and backend, key configuration was defined as environment variables. This means multiple containers of the API or frontend could be running with different parameters set. As they are containers, they are all isolated from each other and run completely separately. There could be instances for production or staging or many other deployments.
For environment variables to be useful in the web app, a custom container was created that took the container's environment variables and got them into the client-side JavaScript where the vue app was compiled to.
The frontend was bundled into Single Page App, meaning there is only one index.html and all routing is virtual, handled by JavaScript.
To get environment variables into the SPA was a bit tricky.
The bundled HTML and JavaScript was put into an Nginx container for deployment.
There was a custom bash script that ran when the container started that looked for a CONFIG_KEYS environment variable.
If it found that variable it opened the index.html and injected a tiny script tag into the <head>.
To demonstrate how it worked, if these variables were set:
CONFIG_KEYS="API_URL,APP_NAME"
API_URL="https://api.gabber.audio"
APP_NAME="Gabber"
It would look at CONFIG_KEYS and inject this script tag:
<script>
  window.CONFIG = {
    API_URL: 'https://api.gabber.audio',
    APP_NAME: 'https://api.gabber.audio',
  }
</script>
Any variable passed to CONFIG_KEYS would be set on window.CONFIG which the client-side JavaScript could test for and use those values.